
Bookcase Brownstone
My Dad made this bookcase for my sewing studio at what was my store, so I wanted to do something special with it when I brought it home.
Having nice thick boards, the bookcase could be turned into a miniature house with long wide rooms. Something that you just can't get from a die cut plywood dollhouse kit.
Each of the shelves in the bookcase become a floor in the new miniature brownstone. Why a brownstone? Long narrow rooms and high ceilings. Sounds like a brownstone to me.

I liked the height of the top two floors, but the lower floor was a bit too tall.

So, I built up the lower floor by approximately two inches ...

... by placing 1" x 2" board at intervals along the lower floor.
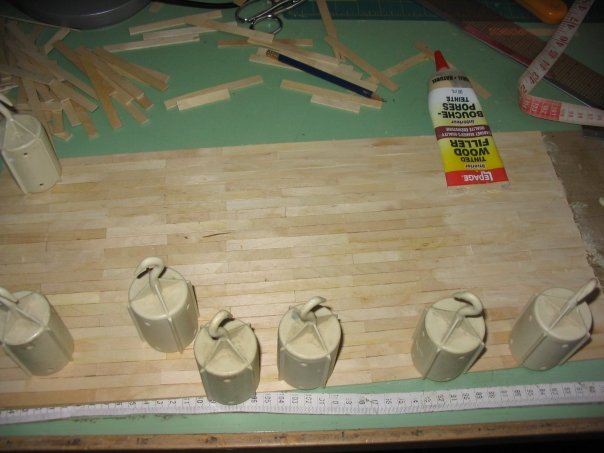
This how you do a miniature hardwood floor. You make a template the shape of the room foot print from medium weight cardboard and then you cut the rounded ends off unused Popsicle sticks and glue them in place, staggering them as you would full-sized hardwood planks.

Given the frightening cost of miniature wallpapers, I paid a visit to my local salvage store, and bought a few rolls of ordinary wall paper for $1 each. Using textures, like this deep brown suede effect on the master bedroom ...

And the same textured suede look in gold on the bathroom walls, I saved a ton of funds and am more than pleased with the results.

Miniature faux vinyls are about as costly as miniature flooring and wallpapers, so I bought a roll of mactac from my local Dollar Store, also a $1 a roll, and now I have vinyl flooring in my miniature kitchen.

The miniature kitchen cabinets aren't my own, I bought them. I did, however, cover the counter with a tiny marble effect mactac and did 'printies' of oven door, dishwasher door and refrigerator. I now have stainless steel appliances in my little house, lol

The floors took much filling with wood filler, sanding and varnishing to get to such a high shine ...

... but they were well worth the effort.

The dark textured effect wallpaper would be too over-powering for a smaller room, but on the long living/dining room combination, it looks rich and elegant.

The 'marble tiles' for the bathroom, were a bit trickier to accomplish. I used a black and gold marble effect mactac and with a metal ruler and utility knife, cut it into 2" square blocks. I then turned every other block 180 degrees, creating a random marble tile effect. I think it looks great.

An overall view of the bookcase so far. The crown mouldings and baseboards were tedious to glue in place, but they make such a difference, they are a must.

Time for some furniture. While I do make miniature furniture, these pieces were purchased. I decided to furnish the entire brown stone in the Queen Anne style.

My favourite details of the master bedroom are the black leather luggage stored over the mahogany wardrobe and the teeny tiny teddy bear on HIS side of the bedroom, lol

An elegant vanity and jewelry box give her side of the master bedroom much elegance and femininity.
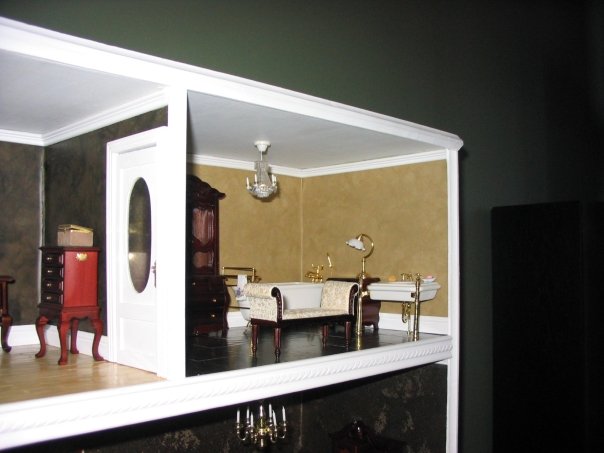
This miniature bathroom is luxurious beyond all wishes. So, through the stained glass door ...

... which I made myself using my computer and a printable overhead transparency sheet. No kidding, that's what I used.

The miniature pieces in this bathroom are actual porcelain and brass.

I've actually moved the tiny crystal chandelier over the claw tub. The lamp to the right and the accessories on the sink are Reuters Porcelain.

Most full-sized dining rooms aren't this elegant.
The ship over the 'marble' fireplace is intricately detailed as is the tiny strung violin which, believe it or not, makes sound when you draw the tiny bow over it.

The little dog laying in front of the fireplace still needs a rug, but he's very very special to me as he was given to me by my late Aunt Elizabeth.

The living room in this miniature brownstone is something very special.

This shot gives you an idea of just how long the common room of this miniature house is.

Tho it still needs its 'soft furnishing', pillows, rugs, paintings, accessories, the living room is well on its way to becoming one of the best rooms in the miniature house.

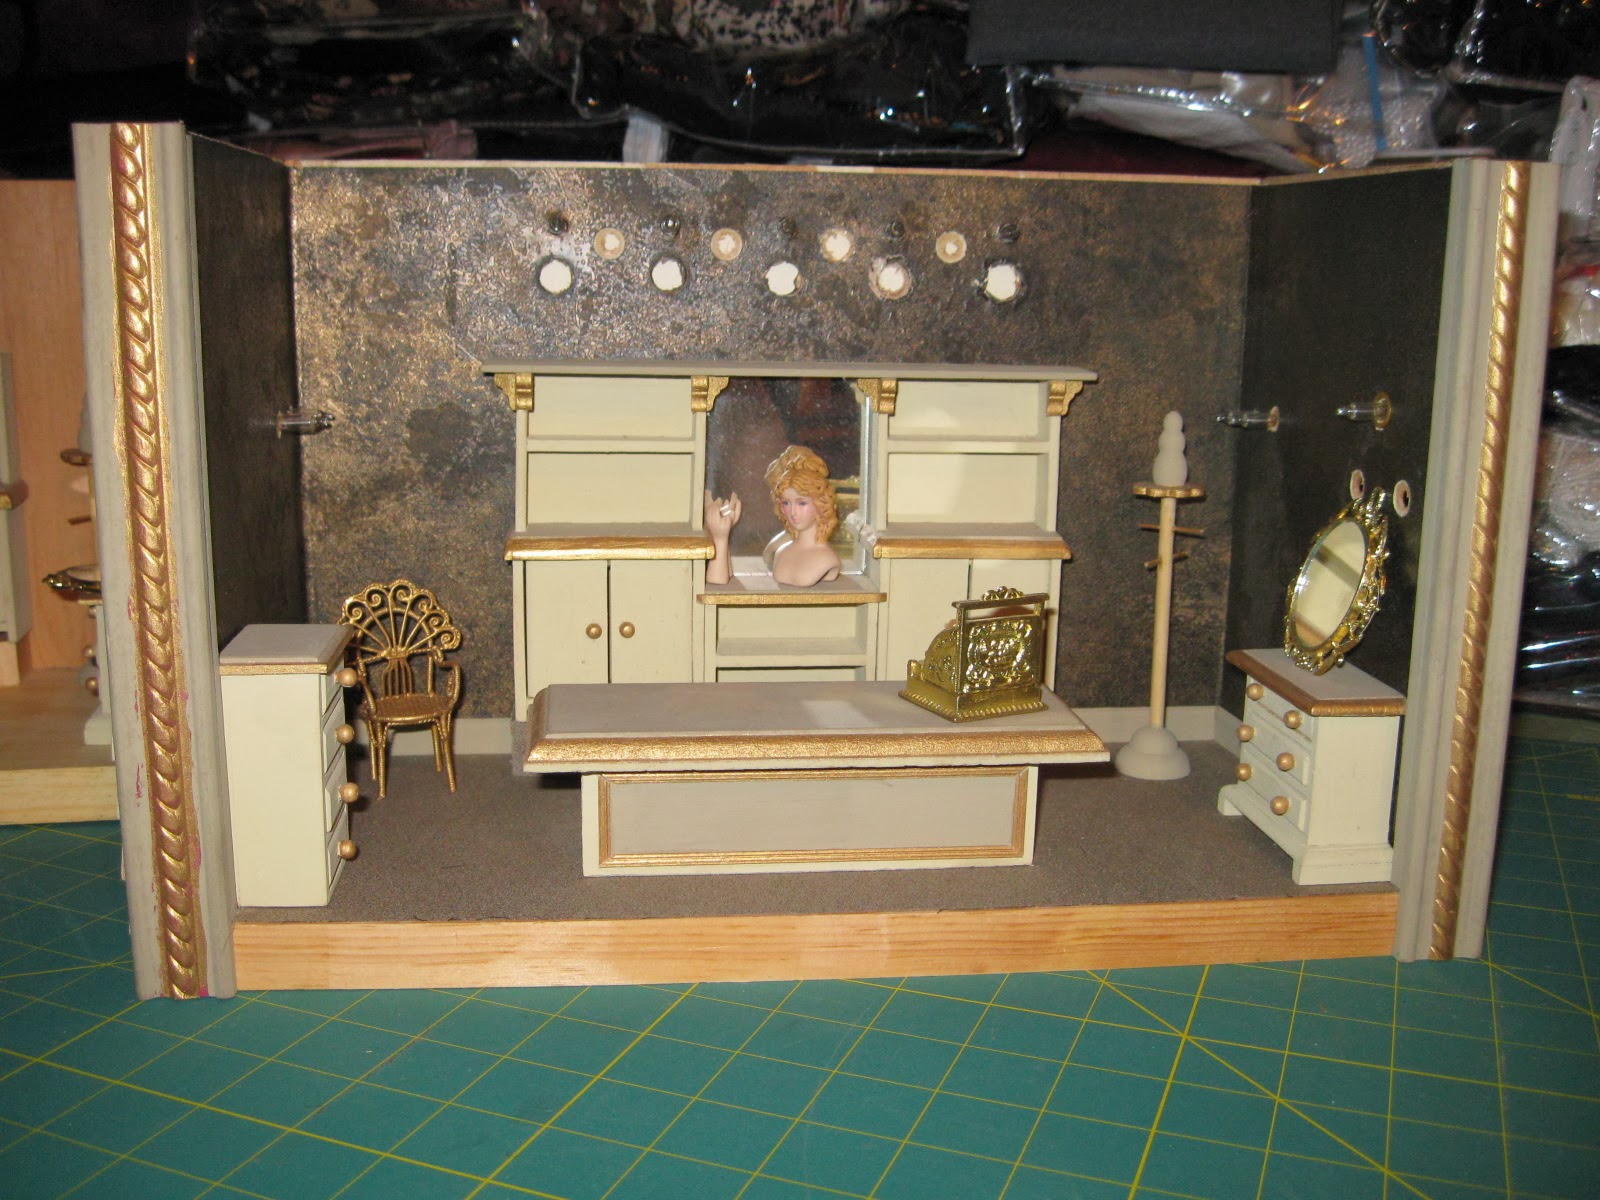
The den is actually a his and hers study with black lacquer desks and pecan wood and leather furnishings.

The finishing touches will really make a big difference to this room.

The wallpaper is actually a 'linen effect' paper that is from, you guessed it, my local salvage store.

Last but not least, the kitchen, the heart of any home. Note the under-the-counter microwave and coffee pot with glass carafe.

An overview of the entire brownstone. When I was contemplating selling my own home, I jokingly asked my then real estate agent if he could list a miniature house, because for what it's cost me, one would think it's almost a real house, lol (btw you need to work on your sense of humour and your co-worker his respect for clients)
Writer's Cottage in 1:12th scale - A bashed Greenleaf Buttercup kit
This has been a very long build for a very small house but it's been a very good learning process and will help immeasurably on my next build, which I can't wait to get to, lol
I started with a very basic Buttercup dollhouse kit from Greenleaf dollhouses and bashed it. Bashed, in miniaturist terms, means renovated.
I used to sell Greenleaf kits, thanks to Hobbycraft in Ontario and their very friendly and helpful Sue.
The Buttercup might seem like a good starter kit, but it's frustratingly small for those of us who like realism in their miniature building.

First it was green, then it was rose ...

... which I did not like at all.

Then it was ivory.
I filled in may of the original windows because it was just too 'church like' which is ok if you want to build a church but this is to be a writer's cottage.

Here you can see the newly shaped windows and moved door.
This time I actually got the roof on and shingled but still was not happy with the lack of space on the second floor.

Fed up with the small floor area, I decided to extend the walls so the second floor wouldn't be so cramped.

Since extending the side walls went so well, I decided to extend the front facade upward.

At first, I was going to bring the shingle slope down on either side of the new facade but as you'll see later on, I modified this also, lol

Here I have the corners on the new extension.

Adding the lines for the siding.

Painting the siding (tongue depressors) before applying it, it's much easier.

I like the warm taupe colour, especially with the brown brick in the foundation.

A close up of the siding and brick.

Applying the 'hardwood floor' (Popsicle sticks) to the living room area.
I started gluing them down onto the floor, then read in a miniature forum that it's advisable to made a cardboard template of the floor shape and glue the hardwood onto that instead of trying to reach into the house.

Made sense, so I tried it and it certainly was easier than trying to work inside the house.

I used a utility knife to trim the sticks after.

Here's the floor all varnished. It turned out well. (However, the cardboard has since separated in its layers now that it's glued into the house. I'll be using 1/8th plywood from now on.)

Premade dollhouse flooring is expensive and not much choice in colours available. So, I printed this 'marble' vinyl flooring and laminated it.

I like how my kitchen floor turned out.

The upper hardwood floor is actually the original floor from the living room.
I moved it upstairs and made a new floor for the living room because I added a bay to the living room.

The battery pack for the mini lights.
I've planned (hopefully correctly) where each light should be and have brought some up through the floor and have run some up to the second floor and two up into the attic space.

This window is much smaller than it was. It will be over the kitchen counter.

The siding is really starting to look good.

The view down the stairwell. It was a pain-staking process to custom build this little staircase but I'm very pleased with how it turned out.

Here you can see how I've eliminated the side slopes of the roof. The rounded 'shingled' in the gables are the ends of the tongue depressors.

The outside coach light actually lights up and you can see the stairs through the front porch window.

Back stepping a bit here, this is the bay extension in progress.

Muddling my way though the bay construction. Next, it needs siding.

I'll have to custom made windows for it but that will be another learning process.

All it needs now is a roof.

The mess under the house that you aren't supposed to see, lol

The stairs don't look level here but they are not installed yet, just placed to ensure the battery pack fits under them. There will be a kitchen cupboard door that opens to allow access to replace the batteries.

Bringing the wires up to the second floor.

These battery packs are a very economical and fairly easy way to add light to a miniature house.

I cut a tiny groove in the bathroom wall (left) for the light over the sink and the wire to the right runs up to the attic space.

Wiring the bedroom, one light for the night table and one for next to the armchair under the window.

Since the first staircase (upper) went well, I decided to build stairs to the attic (lower). They are very steep, but add another degree of realism to my little house.

This isn't where they'll be placed, they are just laid against the wall to be photographed.

The bathroom wallpaper has been applied and you can see the light over where the sink will be (right) and the one in the alcove to the left, is in the laundry area.
I use real wallpaper in my miniature houses, searching for tiny prints and textures that are small enough for 1:12th scale.

The two bedroom lights as well as one for the stairwell and another one that extends up to the attic.

The lit coach light and the lit doorbell. How many miniature houses have lit doorbells? Not many.
This project has been on hold for too long, time to get at it again!

Here I'm trying different layouts for the tiny bathroom.

The only thing I can't move, is the sink because the light is already installed.

I think I like this layout.

Yup, definitely this one.

This mat and these puppies aren't part of this house build. The mat is actually a label from a winter coat.

The dog is on it to cover up the brand name, lol

I trie this tapestry chair set in the living room of this little house ...

... it's nice but not quite what I had in mind. That's a straw I've placed down over the light wire.

And a purchased lamp shade. You can't see it here, but it has quite a nice effect when lit from within.

These little bathroom accessories are from a company named Chrysnbon. They make very realistic miniature kits. There's even a tiny toilet paper holder.

It seems tiny, but with a built-in laundry area, this miniature bathroom would be quite large if it were built in real life size.

Here you can see both bathroom lights.

That's a tiny little plunger in the corner, lol
Maybe I'll go with this layout instead ...
Miniature Boutiques
These were begun a long time ago. Lately, I've been clearing out my miniature workroom and rediscovering some projects.
Now that I've learned much more about miniature building, I'll be solving some of the problems that got these projects sidelined and getting them finished.

These were to be a jewelry and bridal boutique. The porcelain head and hands were a doll kit that I used as a mannequin head and glove display.
The wallpaper in this room box needs to be removed and new applied.

Going to do this bridal room box with a different wallpaper, otherwise they'll be much the same.
The Pink Poodle Cafe
There used to actually be a Pink Poodle Restaurant just outside of St. John's in the then town (now city) of Mount Pearl.
Not sure what this Pink Poodle will be yet, diner, hair salon, spa, something different from a sewing shop.

I might tone down the pink a bit, it's a bit too 'cotton candy' for my taste. I want it to be feminine, not tacky.

The reason this kit got sidelined for so long is because a. there just isn't that much room in it, even with the proposed extension and b. I framed out the windows without any size for premade windows in mind so it will require custom made windows.
Now that I have more miniature building experience, that isn't so daunting.

I have most of the siding on this little house and most of the windows are framed out. I really should get at it again and see what I can accomplish.

The portion of this side of the house with no siding is to have an extension added. Got the creative mind started again, lol
Beaded Canopy Bed

I started with a premade 1:12th bed set and removed the horribly cheap fabric canopy and bed ruffle.

I added satin/metalic woven ribbon to the sideboards.

Covered the matress with black satin.

This is the bed canopy without the original fabric.

I then covered the canopy with a sparkily tulle and ...

... added the beaded fringe.

The settee at the foot of the bed is one of my own pieces, made from scratch and covered with suede.
The dressing screen is purchased. It still needs pillows and sheets but I'm pleased with it.
Here's another scratch-built settee in progress:

The small pieces need to be cut with exact precision or they do not fit together properly.
When working with a small scale, there is even less room for error. These are the pieces for the fuschia settee.

And these are the pieces for the blue settee. I used an iron on fusible bond to adhere the suede to the wood. It worked amazingly well.

A scrap of blue leather from a clothing alteration is enough to cover several small pieces of furniture.

The legs of the fuschia settee are turned and the feet of the blue settee are glass beads.
Freecycle Dollhouse
This dollhouse kit I got for free thanks to Freecycle and a generous Lady.

It was a big surprise when I assembled it cause it's not the house shown on the box cover, lol

I do like it very much tho and it sure looks like it will be a lovely little stone-covered cottage, someday.
Harrison Dollhouse Kit

It's difficult to get a sense of just how large this dollhouse kit is from this photo. The first and second floor are 8" tall each and the attic is about 12" tall. That's 26 inches high.

It's meant to be a tudor style house, but I have my doubts that that's what I'll do.
Quarter Scale Village
This little village of six buildings was made from a Greenleaf kit and it is usually displayed across my fireplace mantle though this past Christmas, I was too ill to decorate it.

Made from a Greenleaf 1/4" scale kit, the miniature village consists of a firehall, a general store ...

... a train station, a sweet shop ...

... a gazebo ...

... and a library (the crystal church is something my mom gave me years ago) .
_________________________________________________________________
Painted Lady Victorian

This is what the actual Real Good Toys dollhouse kit looks like.
Its cost, along with the extremely high cost of shippage, made purchasing it impossible right now so I decided to try a scratch build from just the photo.

I started by building the foundation out of 1" x 2" strapping. The footprint of this miniature house is approx 27" x 19".

I added cross supports where each wall would be.

I decided to apply the final finish to the foundation before building a house on it. I figured that would be easier, lol

This was my first attempt at egg carton stonework. It turned out very nicely.

Applying the log cabin hardwood flooring template I designed on my computer. Hopefully, I have the lines spaced the same as the mini sticks I'm using as flooring.
This is the same log cabin pattern that is in my real home. The divider wall between living and dining rooms goes where the tiny horizontal lines are.
This is the same log cabin pattern that is in my real home. The divider wall between living and dining rooms goes where the tiny horizontal lines are.

I wasn't happy with the irregular edge left by the egg carton foundation, so I cut a new floor and glued it over the templates which I'll have to reprint and glue on again. If at first you don't succeed, try and try again.

I do spend a lot of time waiting for glue and wood filler to dry, lol (Notice all the egg cartons in the background. I've been collecting them for many years.)

I love the way this arch travels under the staircase, might try to incorporate this into my miniature house.

After re-drawing the floor templates using a computer graphic program and after doing a bit of floor layout redesign, I've glued the new templates in place

Starting at the center, I cut four boards the same length for each side. Here I've only glued the center two in place.
Traditional Newfoundland Back Porch
A few years ago, I wanted to make something special for my Dad for Christmas. Without any set plan in mind, I started building with just a general idea of what I wanted to create.

The glass in the miniature windows is real. I framed them with base wood and painted the frames white. The 'siding' is lengths of tongue depressors with the rounded ends removed.

I printed a template for the siding, it's just horizontal parallel lines. Here I've notched out a piece of the siding for under the window sill.

Here's one part of the miniature house with the siding complete.

This was to be a corner room box with a rounded base.

I don't usually use plastic in my miniature building, but this vinyl flagstone was just right especially with the colour I chose for the siding.

The weights from my knitting machine are 1lb each and have done more miniature work than knitting, lol
I use them to hold pieces of wood in place until the glue is dry.

Here are the four pieces of the house with siding and flagstone in place.

At first, I chose this photo as an interior for the room box.

As the room box's personality began to emerge, I decided I didn't like it and chose something more suitable.

To simulate grass, I scraped off shavings from the florist's foam brick and sprinkled them into a thick coat of glue.
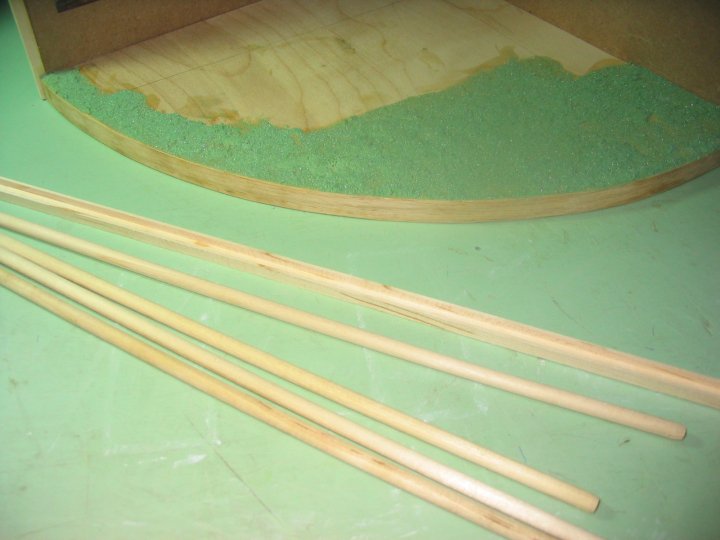
Looks pretty much like grass.

Now, it's needs a back door. I put the header and door jams in place first.

The 'wood shipment' to construct the back door from has been delivered, lol

I wanted to make a traditional 'slab door' for this little house vignette, so I glued lengths of coffee stir sticks onto a piece of cardboard.

I painted the door white and added tiny hinges and old-fashioned door handle.

I'm really pleased with how it turned out.

Now, to assemble the final pieces of the room box. The partial photos on either side will be the outdoors scene once the room box is completed.

I needed wooden strips to glue the edges of the exterior walls onto.

And I chose a much more suitable interior photo and installed a light bulb to illuminate the interior.

I printed tiny newspaper pages, folded them and placed the inside the miniature mail box. The sand is glued in place to make the walkway appear to carry on into the background photo.

The green painter's tape holds the pieces together until the glue dries and miniature accessories befitting my Dad's personality and life were glued into place.

Here the trim is added around the roof edge and painted white.

Dad loves to fed the blue jays, so I added them allover the place along with some real birdseed in the miniature wheel barrel.
My Mom didn't like cats, so I added one for Dad, lol

She's gotten into the milk, as cats do.

My favourite part (aside from Dad's delight) is the blue jay perched on the edge of the silver bucket drinking from the dripping water pump.
No comments:
Post a Comment